
Using SSH


...to manage your Synology box.
SSH is a great tool for remotely accessing a basic file and command system for your machine, and while it can look a little daunting (there's no slick GUI to help you out) it's easy enough to learn, and in some cases is the only way to complete tasks or settings. It also acts as a failsafe in case you manage to lock yourself out of your NAS gui.
This page gives an overview of how to SSH into your Synology NAS, the steps you need to take, the types of commands you will need to be familiar with, and aliases used as shortcuts for typing.
Page contents and links (click me)
Preparing the NAS
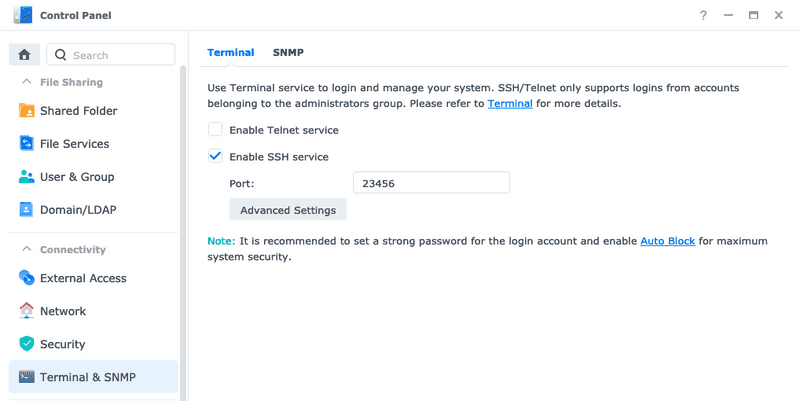
Log in to DSM with an admin account, open control panel and in the search bar type ssh and hit enter. This will take you to the Terminal page. You must check the Enable SSH Service box, and I highly recommend you change your port to something above 3000 (the set default is 22)

Take note of the IP address of your NAS - this can be found in Control Panel->Network->Network Interface, and looking under LAN 1 or LAN 2 (I have two ports on my NAS connected to two different routers which is why I have multiple IPs, either one is fine)

Know your username which must be an admin user.
Different CLI programs
Using Putty
Putty is a versatile product with a lot of options. It's not my favourite, however it does have a lot of options you can configure.
When you open putty, you're greeted with the configuration window:

- Open putty
- Write your
user@nasIPaddressandportnumberin the red rectangle fields, such asmyuser@192.168.1.3and22(or whatever you changed the port to on your machine) - Hit
Openat the bottom
Some machines allow you to connect if you know the machine name (such as the example in the image below). If you know yours, this is also a suitable input
You will be presented with a CLI screen and prompted to enter your user password. Your keystrokes will not be printed on the screen, but once you hit enter (and you've entered your password correctly) you're in to your machine:


You can save these login credentials in putty, and there are other security options for using paired keys (which I'll let you read up on here if you want to, or scroll down for a handy video. In a nutshell, you generate your own keys (either in CLI or puttygen) and do a whole bunch of other stuff to make sure that only your chosen clients can connect via SSH, that you don't need to input your password each time, etc.
Using Windows Powershell

Windows Powershell is similar to the windows command prompt, and looks like most CLI windows. I use it because I couldn't get pair keys to work with putty, but I could with this.
When you open it up you'll get this type of image (as above) and to access your machine you will type in the following: ssh user@IP -p "port number" or in otherwords ssh myuser@192.168.1.2 -p 3872. This will then connect to your machine, and prompt you to put in your password.
One thing you can do to speed up this process is create a shortcut which already has that ssh command as part of it.
- Create the shortcut
You can either do this by right clicking on yourdesktop-->create shortcutand filling everything in manually, or locating yourpowershell.exeprogram in your files, right click and then clickcreate shortcut - Modify the shortcut
Right click on the shortcut and selectproperties. Navigate to theshortuttab and locate thetargetfield. If you used the second method above, this should already be pointing to yourpowershell.exe. If not, then you'll need to fill this in as well before the next step - In the same field we add our command from above to the end of the target string. This means you should have something that looks like
C:\path\to\powershell.exe ssh myuser@192.168.1.2 -p 3872

4. Rename the shortcut on your desktop by right clicking and selecting rename.
I also like to add this to my start menu as a tile which makes it really quick for me to select it
Windows Terminal is now a fully viable alternative to putty or powershell, and can be downloaded from the Microsoft Store if you want to give it a go. Since writing this walkthrough, I've since changed to Win Terminal
Another way to speed up your login time is by using preshared keys, which will mean you no longer need to type in your password each time you start a session. Scroll down for more.
Enabling SSH for a regular user
In general it could be argued that it's best not to SSH into your NAS using a root or admin account. However, by default, Synology has disabled non-admin users from doing this. This next bit describes how to enable your regular user to use SSH:
- Know the username of the user you want to enable, or create a brand new one (via DSM)
- SSH into your box using your admin user and access the root user level by typing
sudo su -followed by your admin password - Edit (using vi, vim or nano) the file
/etc/passwd, you should see something like this (just not blurred)

- You'll notice that the last part of your user's line will say
/bin/nologin. Change this to/bin/ashas it is shown above - Copy your admin user's
HOME/.profileto/var/services/homes/[new user]. So if we were to do this for a user called SSH we would type the following
cd
cp /.profile /var/services/homes/SSH/.profile file may be in a different place- You should now be able to SSH into your NAS with your non-admin user's name and password
The above is based on the following guide:

Logging in with Preshared Keys
Specifically for Synology, the below video will talk you through the process needed to set up your preshared keys. Note that although he is on a Mac, the keygen command he uses works perfectly fine on a Windows machine.
If you prefer to read rather than watch...
Basic Commands
Now that we're SSH'd into our machine, below are some basic commands and ways to get around (select a tab to see more).
You will likely have a curser after something called User@yourMachineName:~$. You will also likely be in your default 'home' folder.
ls -a
This prints out all the files and folders in your current directory:

ls -al
A similar printout, but in a list format and more specific info about the file or folder creation date, owner and permissions (the letters on the left):

Those permissions show read/write permissions for the files and folders based on the current user, and is a linux staple. Click here to read up more on that, but in a nutshell:

cd
cd means 'change directory'. If you are selecting a folder inside your current directory, you simply write cd FolderName (case is sensitive and important):
If you are changing directories completely, it is followed with a forward slash / and the folder path:

To return to your 'home' folder, you simply type cd and you shall return:

Sudo
This command is used as a prefix for other commands that require root user permissions, and will prompt you for a password (the password persists for a certain amount of time, and then will expire after inactivity, prompting you to type it in again the next time you use it). It looks like this:
sudo [add command here]
Sometimes this is needed to modify, move or delete files, and is needed for docker and docker-compose commands. We will cover aliases to give some quick commands without having to type sudo later on.
It is also possible to enter root mode or root user. It is generally considered a security risk to use this mode all the time, but for certain specific instances you can access it by typing the following:
sudo su -
Again, it will prompt you for your password, and your user prompt will change to root@machinename:~$:

When you are done with this and want to go back to your regular user, simply type exit and hit enter (typing this while using your regular user will result in you exiting your SSH session and your CLI closing).
Mkdir and Touch
mkdir is a command to create a new directory, or folder, and is used in the following way:
mkdir [foldername]
Similarly, to create a new file in the current directory:
touch [filename.ext]
where '.ext. is the extension file type.
when creating names for folders or file in a linux environment such as Synology, try not to use spaces, it can break things
Move, Copy, Delete files
mv /path/to/file_name.ext /path/to/new/folder
This moves a particular file from one location to another. It can also be used to rename a file or folder in the following way:mv /path/to/file_name.ext /path/to/new_file.ext
cp /path/to/file_name.ext /path/to/new/folder
This copies a particular file from one location to another
rm /path/to/file_name.ext
This deletes a file.
If you're getting permission denied errors, either change your user to the owner of the folder/file, or add sudo in front of the command.
the above commands have other arguments which subtly change the command parameters. A full list can be found here
Modifying files
I use the nano command to modify files. Some use vim. It depends what you like. Let's 'nano' into the .bashrc file which you may have seen in the images above:

As you can see, this has completely changed the look of our client, and we're now in a text editor similar to notepad. Unlike 'vim' which requires a button combination press to enter the editing mode, we can begin making changes to the text straight away.
The commands at the bottom of the screen show ^[letter] commands, where ^ is the symbol for your ctrl key. To exit, we type ctrl + x, if we've made any changes it will ask us if we want to save them, hit y then enter to exit.
Aliases
The alias format convention is as follows:
alias [yourPreferredCommand]="[original command]"
e.g. alias hello="hello world" means that typing the word 'hello' and pressing enter will actually push 'hello world' through the cli.
You can type this immediately into your cli, and it will work for the duration of your session, but will not persist once you exit. To have your aliases persist between sessions, we need to store them in a .bashrc file.
For some, you may be able to find a .bashrc_profiles file in the /etc.defaults/ folder. If this is the case, then simply add the aliases (as above) to that file.
The file however may not always be created. To do that, we make sure we're in our home directory (if we're not already) and then input the following (sudo as necessary):
touch ~/.bashrc
note that this only creates it for the user you're currently logged in as, and if you did already have the.bashrc_profilesfile, then it will be deleted and.bashrcthat you create will be used for aliases
This will create our file, which will start off empty. We begin editing it by typing nano .bashrc. We then edit it with one alias per line in the convention mentioned above, and then ctrl+x --> y --> enter to save and exit.
Our final step is to then type each alias, exactly as they appear in our .bashrc file into our cli and hit enter per line. Then we're done.
In our previous example, you will have seen a few aliases I have set up. I do a lot of work with docker, docker network, and docker-compose, as well as nano. All of them require 'sudo' priveleges, and to save myself the time I've made sure that 'sudo' is included by default when I use those commands.