
Creating Your Interactive Smart Home Floor Plan: Part 1

First things first. This. Will. Consume you.
I first came across Home Assistant (HA) 18 months ago (you can check out a post about that here which offers some tips for first steps setting it up) not long after buying my first NAS and discovering the joys of docker and containers. It was a natural thing to try, but the version available with docker never sat well with me and I gradually lost interest.
Fast forward to the end of last year and I was gifted an Odroid N2+ which had HA OS pre-installed (click here to see the different types of install and what they offer). It's all this box does and all it's there for, and in recent weeks I've finally had the chance to play with it.
This series of guides doesn't really show anything more than what's already available to find on the web, but it does consolidate it (and my research) into one place. I'll try and be concise and include lots of pictures, but be prepared, you've gotta be in this for the long haul.
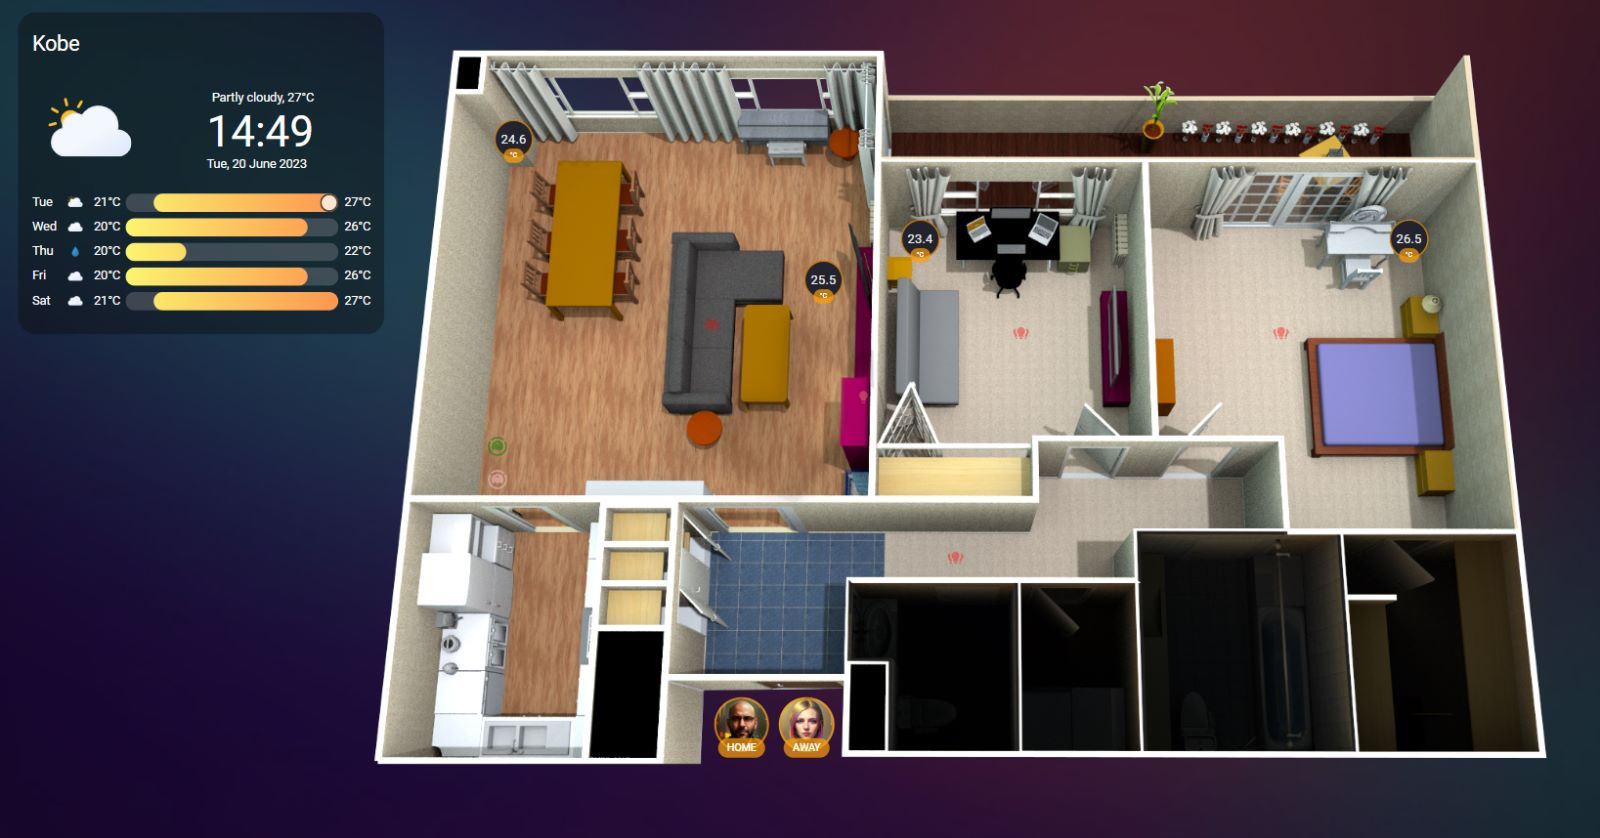
The Goal, The Outcome, The PRIZE
So what's the end goal? It's an interactive dashboard in Home Assistant which shows your home. The way your dashboard looks will change (automatically) depending on a number of factors:
- Time of day
- Lights are on or off
- A particular room is occupied
- Your TV is on or off
You can change your dashboard based on the buttons and switches we'll add into it.
This guide is based on a couple of prerequisites and a certain familiarity/comfort level with both HA and yaml code, however it will show you how to:
- Create a 3D layout that looks like your home
- Edit the 3D views to be able to use on a Home Assistant dashboard
- Integrate your lights into the 3D view to make it 'clickable'
- Set up some automations so that lights will turn on or off based on room occupancy and time of day or light level
My Operating System and Hardware
I'm including this info for reference only - what you buy or install HA on is ultimately up to you, but I would recommend you install either HA OS or HA Supervised to get a fuller-featured experience. I am not providing links to any store pages, however they are readily available after a quick web search.
Hardware
- Machine: Odroid N2+ mini-PC
- CPU: Quad-core Cortex-A73
- RAM: 4GB DDR4
Software
- Home Assistant OS
Peripherals
- Bluetooth dongle
- Home Assistant Sky Connect (which is currently used solely as a Zigbee coordinator)
My Smart Equipment
This is obviously an ongoing thing as I buy and try out new tech, but for now I have the following:
Lights
All dimmable with some measure of color temperature selection, and very importantly don't require a separate hardware hub either.
- 4x Sengled Smart Bulbs (WiFi enabled, size E26)
- 5x LIFX Smart Bulbs (WiFi enabled, size E27)
- 4x LEDVANCE Smart+ Bulbs (Zigbee enabled, size E26)
- 2x Philips Hue Candles (Zigbee enabled, size E17)
- 1x Yeelight Bedside Lamp (also known as the Staria Pro, WiFi enabled)
Microcontroller:
- 4x ESP32 NodeMCU boards (WiFi enabled, breadboard required to connect to various sensors)

Sensors:
- 4x Dallas DS18B20 Temperature Sensors (require a 4.7k Ohm resistor when receiving 3.3v power, this page has a great explanation of how to connect them up to your microcontroller)

- 4x BH1750 Illumination Intensity Sensors. Note that if you do buy these, you'll be required to solder the pins, so get practicing. Here's a good example of bad soldering:

- 4x HLK-LD2140B Presence Detection Sensors by Hi-Link (standalone Bluetooth enabled). I went with a variant from AliExpress which had paired the sensor with a USB module for easy power, no soldering required

Buttons
- 4x Aqara Mini Switches (also called Aqara Button; Zigbee enabled, no hub required)
Additional:
- Roomba i7 (robot vacuum)
- Braava M6 (robot mop)
- 2x LG Smart TVs
You don't need to match the above to get started, but it will help understand some of my method later on.
Prerequisites
- A working Home Assistant setup with access and editing ability to/for the
configuration.yaml, andconfigdirectory - ESPHome and Studio Code Server (VSCode Editor) installed through the
Add-onspage - Some sensors or smart equipment to integrate with HA
- Zigbee and Bluetooth connectivity as required (if your system doesn't already have it. Check the Bluetooth recommended high-performance adapters here and note that not all Bluetooth dongles will work with Home Assistant)
- A basic knowledge of
yamland how it should look (though to be honest you really don't need to know that much)
I'll be using the following programs on my main computer to create the floorplan and make the required modifications to the images, however provided you have something comparable it should work out for you:
- SweetHome 3D (floor-plan creator with 3D capability)
- GIMP (image manipulation tool)
OK so what's first?
Stay tuned for the next part of the guide series where you'll begin working on your 3D floorplan and getting the images ready for editing.
Related Articles
 PTS
PTS PTS
PTS