
PostgreSQL + pgAdmin4 Docker Containers

Databases are extremely useful. As containers, they can also be resource intensive, so you probably don't want too many. The below walkthrough shows you how to create a single server with the ability to create multiple databases for any postgres need you have.
For those interested, I explain a bit more about the various types of database here, and you can check out this page's MySQL counterpart here.
First up, we need to
Create the containers
SSH into your machine. The first thing we will do is create a custom network in docker by typing:
docker network create postgresfor more detailed information about docker networks, click here
Now it's time to create our postgres and pgAdmin containers. In your favourite docker compose folder, create your 'docker-compose.yml' and copy paste the following:
networks:
  postgres:
    external: true

services:
  db:
    container_name: postgres
    image: postgres
    restart: always
    environment:
      POSTGRES_USER: root #change if necessary
      POSTGRES_PASSWORD: root #change if necessary
      POSTGRES_DB: test_DB #change if necessary
    ports:
      - "5432:5432" #change *before* the : if necessary
    networks:
      - postgres

  pgadmin:
    container_name: pgadmin4
    image: dpage/pgadmin4
    restart: always
    environment:
      PGADMIN_DEFAULT_EMAIL: admin@admin.com #only needed for logon so no need to change
      PGADMIN_DEFAULT_PASSWORD: a-good-password #change
    ports:
      - "80:80" #change *before* the : if necessary
    networks:
      - postgres
    depends_on:
- dbnetworks variables have been set to the postgres network we createdIn SSH, navigate to the same folder and run docker-compose up -d. This will create your postgres database container AND your admin container. In both instances, as we didn't specify otherwise, the latest version of each image will be pulled.
We now only need to work with the admin container.
if you have set up your NAS firewall to block everything you haven't explicitly allowed, you will need to allow the docker network IPs and ports for these containers. The ports are listed above after the:. To find your containers' IPs, type indocker network inspect [network name]and note the address, which will start172.xx.x.x
There are 5 things we now need to do, listed below in order:
- Access pgAdmin
- Create a postgres server
- Create a login
- Create a database
- Enable communication between postgres and another container
Accessing pgAdmin
In your browser, type in your NAS IP, : followed by the port number, for instance 192.168.1.2:80, which will bring you to the login screen:

Login using the credentials you specified in the `docker-compose.yml` for PGADMIN_DEFAULT_EMAIL and PFADMIN_DEFAULT_PASSWORD, and you'll be greeted by an almost blank screen.
Creating a new server
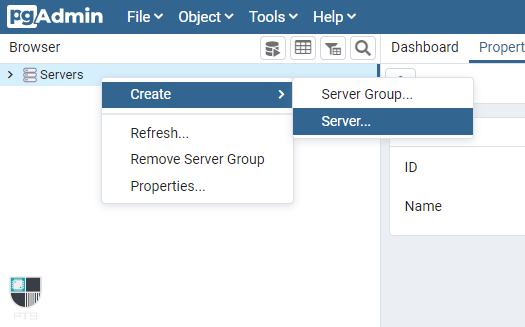
In the top left corner, right click Servers, then Create > Server

In the General tab, give it a name:

Head over to the Connection tab. Enter postgres as the hostname, port 5432, keep the maintenance database as postgres, then enter the username and password you specified as the POSTGRES_USERNAME and POSTGRES_PASSWORD in the docker-compose file above. We set them as root:root, so that's what we'll use below:

Hit Save, and your new server has been created.
Creating a new login
You'll hopefully notice that the test_db and root referenced in the compose file have been created here. You can use these, however I would recommend creating new logins and new databases for each container you plan to use them with.

Not to be confused with creating a new user to access this pgAdmin, we will create a new login which will 'own' a database or group of databases.
Right-click on Login/Group Roles and select Create > Login/Group Role...

A screen will pop up with multiple tabs. Under General give your new login a name:

and then navigate to Privileges. Here we only need to toggle Can login? to Yes :

Hit save and you've created your first login!

Creating a new database
In the nav panel on the left hand side of the screen, right click Databases, then click Create > Database.... In the pop up, give your database a name and select the Owner from the drop down (in this case, our newly created MyName):

Navigate to the Security tab, hit the + on the Privileges column.

Choose your Grantee (normally same as Owner) click into the empty 'Privileges' box and select All. Leave the 'Grantor' as root and hit save.

Making sure your new container can communicate with Postgres
Now that you've configured your new database inside your Postgres container, you need to make sure that your app can connect to it. To do this, you need to make sure that your app container and your Postgres container are on the same docker network.
if you need/want to create a new network, follow the steps here
Let's say we wanted to connect our Postgress and Nextcloud containers to a network called databases. We start off with creating the network (in SSH):
docker network create databasesThere are then a couple of ways we can connect our containers to new networks:
- Modify your docker-compose file to include the new network (you can use more than one network in your 'networks' block, and you can connect your container to more than one network at a time) and run
docker-compose up -d postgresordocker-compose up -d nextcloud. Defining the container name will ensure that when your compose file includes more than one container, only the defined container is recreated - Use Portainer - go to your container inside portainer, scroll to the bottom, select the right network from the drop down list and click the 'Join network' button
- SSH - you can connect a container to a network by typing
docker network connect [network name] [container name]- So, to connect both our
postgresandnextcloudcontainers to thedatabasesnetwork, we type
docker network connect databases postgres && docker network connect databases nextcloudyou can read up a lot more on docker networking at the official docker documentation here
Congratulations, you now have a new postgres server, database and login, and know how to make sure it can communicate with your container app. Recreate the login, database and network steps for each new postgres DB requirement you have!
Related Articles
 PTS
PTS PTS
PTS